Thursday 25 March 2010

Rendering Begins - Extra Animations

We have finally started to render our project - our initial idea was to use final gather in the main scene... this turned out to be an option which just wasnt feasible. Render times were increased dramatically... we actually calculated the full scene to take 90 days! Obviously this was not an option.
We fiddled with settings in maya, disabling final gathering, the results were unsatisfactory. Areas in shadow were far too dark. We played around with various light setups to try and simulate the effect of final gather (the bouncing of light from surrounding objects). The results were an improvement, however the final gather renders appeared far more realistic.
We then decided to fiddle with the mental ray sun preset to greate a global illumination effect. Originally the scene appeared over exposed due to the Vue sky and the Maya exposure and sky reacting with eachother.
We removed the maya sky node from the mental ray sun/sky setup to leave us with just the exposure and sunlight nodes. The results were surprising! The areas of the scene which were cast in shadow would usually appear very dark without the final gather option. By using MR sun and exposure in conjunction with the Vue scene we managed to lighten these areas, when comparing the final gather renders with these, there was not much difference, however the render time per frame went from 20 minutes down to 2-3 minutes!

I have also animated the characters for one of the scenes which features the skulls. Heres a playblast... and heres a screenshot from the render in progress... its at 6 mins per frame with final gather... due to arrive in 2.4 days!

Friday 19 March 2010

Adding Touches


Adding Touches

At the end of the 3rd from last week, the final touches have been applied to various parts of the city(but not all touches). This along with extensive work with Vue 8 to try and create very gloomy and somewhat realistic scenery for the project.


Here I have add some extra features to try and add more depth to the building to try and make as realistic as possible whilst keeping resources in mind (e.g. not to many face as the scene is huge at the moment)


I then went on to textures this and add plant pots to the area


Seen in the images below I have add stoned paths and plant areas (with white borders)


To try and create some kind of soil where the plants will be situated I have used a soft body on a plane as seen below


I then went on to add some extra features to the main template
Since there were some many sacrifices at this temple the stairs were drenched in blood, I have add this as seen below

Then i had to focus on the upper area of the temple


For the final animation that appears at the begging and end of our project will include many factors , like Ncloth, fluids and character animation.

Below demonstrates Ncloth and fluids


Final we have been playing with Vue and have come up with some very nice sky’s which compliment the theme of our project


Finally i have been working on some fluids which will burn more like a big fire, unlike the small touch like fires i had developed earlier.

In the images below its to as easy to see but the fire gives off more smoke as its isn’t as clean a fire as the smaller touches would be. This will appear at either end of the main base where the main temple is situated.
These fires will also be coming from logs, so it is emitting from an object rather than just emitting from an emitter.


Below demonstrate the smoke a bit more clearly and you can see it is burning the logs


Sunday 14 March 2010

Development of Inside Building, Fire Creation and Market Area


Fire Creation

To create some realistic features though out the city I had to create some form of fire. So I began to create it with Maya fluids. Below are a few of the sage it took to develop the fire. All the features are dynamic and individual tweaked to create the final piece. To create any easier work flow within the scene that the fire appears I made sure that the fluid object was cached.

Below is the development of the fire.


Development of the new scene (indoors)

Due to the script being changed we had to create an inside of a building so that we could have a scene which is not part of the landscape and demonstrate some other skills whilst giving us the chance to have a little more complex scene as the main one if very big.

Below is the development process

The building below is where the next scene will take place, this is the a building in the centre of the scene and acts as one of the mains section for the Aztecs to pray to the Gods


In this scene we wanted to include the famous rack of skulls which pops up in many designs and many historical documentaries. They all seem to quote that it contained 1000 skulls. So we were brave and decided to see what this would be like if we tried to incorporate not as many skulls but a great deal. As seen below the rack of skulls.


We did find that it came to around 1 million faces and gave the computer a very hard time and slowed it down dramatically. This presented a huge problem as nothing else was in the scene had been made yet, also the fact that this scene was going to include high res characters we had to change the number of skulls.

Below is an image of all the skulls, as you can see its impressive but just not feasible


So we decided to make a curved display which would look full and fill the screen but would more than half the amount of skulls that would be present


Then I went on to develop the scene more, giving it the features of what a calm Aztec temple would look like.

After toying with ideas for the little block rooms at the top I ended up modelling them to look smooth and almost like priority for seats in the temple for richer Aztecs. This involved modelling many different Ncloths which took some tweaking.


I then went on to add the extra features with in the temple, including fire, chain boundaries , flags ,pots and a skull like entrance to the main rack of skulls
Here is a shot including most of the features


As we had trouble with the Final Gather settings we had to create some form of lighting inside, so we began to make the individual fires to emit light them self’s, so we used some volume lights as seen below.

As seen on the wall of the rack of skulls you can see the light previously created shining in a nice colour. But we didn’t think this was enough so we gave the fire some glow effects

Visor fire with glow included


I then applied the same effect to my fluid created fire along with the lights

Fluid light with glow

Friday 12 March 2010

Normal Mapping and Animation

To increase the level of detail in our priest (which will be seen close up) i have created a normal map in zbrush. Normal maps allow you to add more detail without adding more geometry to the mesh. The result is shown below.

I have also began animating the first and final scene which shows the victim being sacrificed from his perspective. Heres a playblast: This will be rendered in 2 parts. A cut will take place when the 2 models "swap" by having the protagonist blink. I used 2 models because it saved me from animating the walkcycle again. The camera was parented to his head joint to create a more realistic moving camera.

Monday 8 March 2010

Planning camera route
Over the last day or two we managed to complete the camera fly through, this was done with a series of motion paths developed in Maya, these along with cameras which include aims gave us an easy and effective way to have our camera animation.
Below is an example.


The camera animation has been synched with sound file which we will put together in the final gather.
Below is an example of the new sound file, which is not fully completed but gave us the basis to work with for the final product.


Aztec Sound Script | Music Upload

Integration with Vue 8 and Maya 2009

First of all to make the process easier we created the scene in Vue(this includes the landscape, sea and atmosphere), this took some getting used to as I had to learn a whole new software package .As its purpose it hugely different to Maya it had different abilities and controls which were hard to learn. After this milestone was passed we began building the scene as seen below.


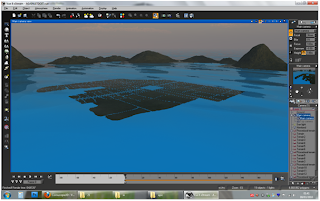
We then went on to integrate this into Maya so that we could include the building and areas which were made in Maya, after several crashes we managed to get it to work and looked like so.


Here is a preview render of the how the scene would look


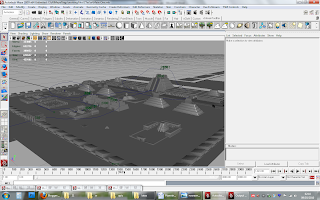
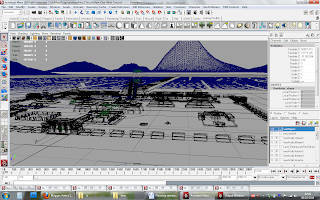
Further Landscape and Modelling Development

Currently the models are near ready, after applying the camera animation I was able to find out which buildings will need the most attention and was able to apply more detailed and realistic textures. Since all the models are already textured it’s just a case of giving them that gritty look, as the building weren’t made of modern materials and there for had a lot of ware on them.
Here are some example of the models at their current stage

Below was a test to see how well the trees from Vue integrated with the Maya scene and settings. As you can see they are very impressive. These will be scattered throughout the scene in many different sizes and forms and each edited to be unique and avoid any kind of repetition


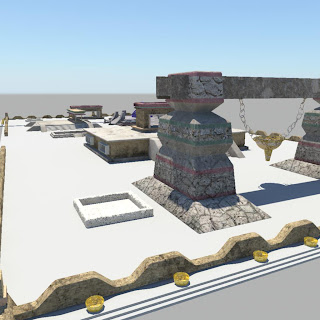
Here is a as an area of the scene where the locals will gather to socialise and pray to the gods. As you an see its textures represent the kind of condition we expected the buildings to be in at that time.


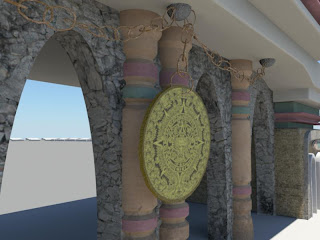
This is the main entrance to the inner city walls, here i have made sure its looks gritty and have created the ancient calendar that the Aztecs used. This was a very meaningful icon in their existence and was heavily used through their city.


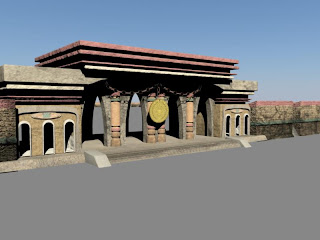
Here is the entrance along with walls looking a bit more realistic than the above, with more dirt and ware .For the walls I made sure I had around ten different textures(of dirt and decay) so it does look repeated and looks more natural.

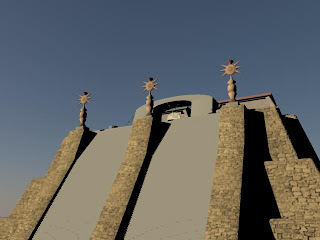
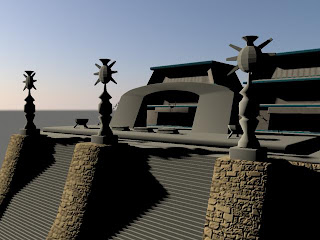
The main temple its self is textured and modelled, here it just an example of some extra features I have applied to give it the finishing touch.

Below was just an example of some of the Vue sky and light effect we have been toying with, as we are trying to get a gloomy kind of feel, we need it to be darkish with a tint of orange in the atmosphere. We hope to achieve this with some fog or haze.

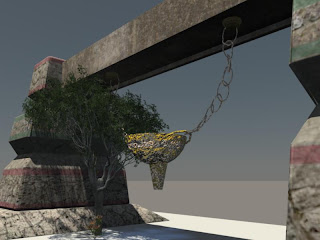
Once again the main temple, here we can see the death beds where the sacrificial members will be executed. These aren’t textured yet, but when they are they will be drenched in blood. Here we also have two fire pots which will be emitting some kind of flame.


Finally this is the latest building I have been working on, it’s not totally finished yet but is coming along nicely